
How to Hoop Fabric for Machine Embroidery
How to hoop fabric for machine embroidery: stabilizer, taut not stretched, using the grid, plus floating delicate fabrics and avoiding hoop burn.
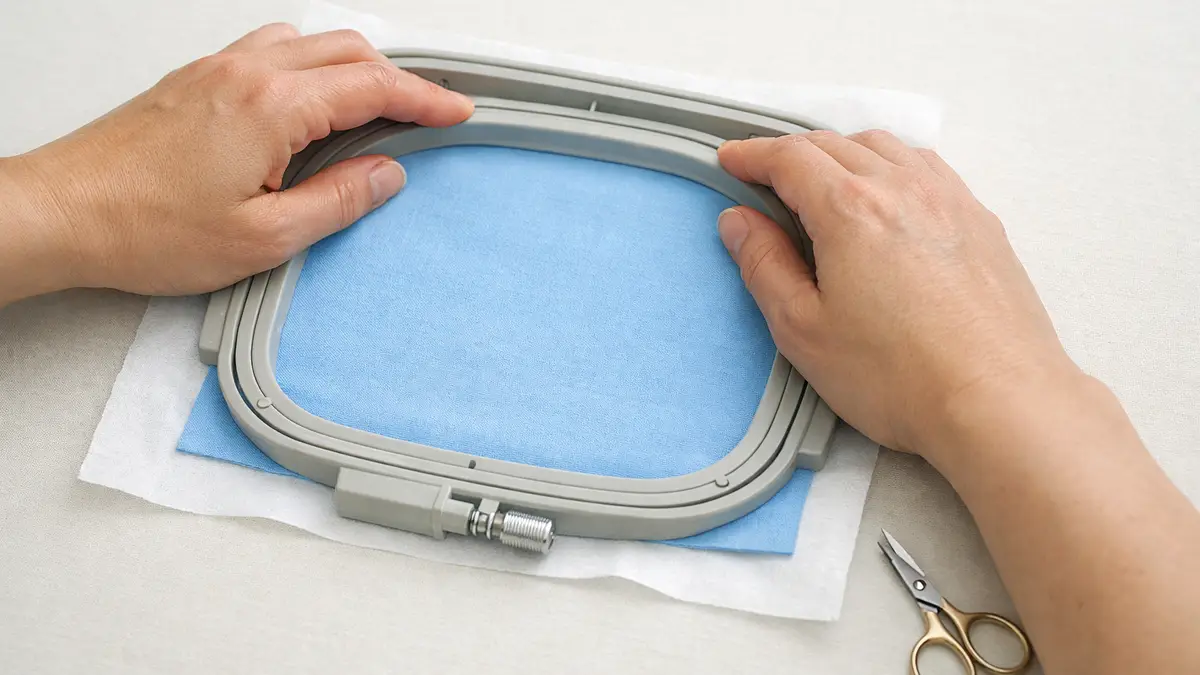
Hooping is the step that decides whether a design stitches flat and in register or comes out puckered and shifted. The mechanics are quick to learn; the judgment is in how firm to make the fabric and when not to hoop it at all. This guide covers both, plus the two problems hooping causes most often: distortion and hoop burn.
How do you hoop fabric for embroidery?
Lay the pieces flat over the loosened outer ring, press the inner ring in, then tighten and smooth. The full sequence:
- Loosen the screw on the outer ring until the inner ring drops in with light pressure.
- Place the outer ring on a flat surface, screw at the near edge so you can reach it.
- Lay the stabilizer, then the fabric over the outer ring, flat and square to the hoop edges.
- Press the inner ring down evenly into the outer ring, trapping both layers.
- Tighten the screw most of the way, then gently pull the fabric edges to remove slack.
- Check it is flat and square, with the design area centered and the grain straight.
Use the gridded template that comes with most hoops to center and square the fabric before you press the inner ring in. Our beginner guide shows this on a first project.
How tight should the fabric be in the hoop?
Taut and flat like a drum head, but never stretched. This is the rule that matters most and the one most often gotten wrong. You want the wrinkles gone and the surface firm, with the weave or knit sitting at its natural size, not pulled larger.
Stretched fabric is a trap because it looks perfect in the hoop. The moment stitching finishes and you release the hoop, the fabric relaxes to its real size, the stitches crowd together, and the design puckers. Knits are the worst for this because they stretch so easily. Smooth out slack by easing the fabric, not by pulling it tight. If you can see the weave distorting, you have pulled too far.
Do you hoop the stabilizer with the fabric?
Usually yes, you hoop stabilizer and fabric together so both are held firm. Cut-away stabilizer behind knits and tear-away behind stable wovens both go in the hoop with the fabric, giving the stitches a stable base and sharing the tension.
The stabilizer is doing the real stability work; the hoop just holds everything still. This is why the right stabilizer matters more than a death grip on the hoop screw. Match the stabilizer to the fabric and the design, then hoop them together firmly but gently. Our stabilizer guide covers cut-away versus tear-away versus water-soluble by fabric type.
When should you float fabric instead of hooping it?
Float when the fabric will not sit flat in a hoop, will mark, or is too thick or small to grip. Floating means hooping the stabilizer alone and attaching the fabric on top, so the hoop ring never touches the fabric.
| Fabric or item | Why float | How to hold it |
|---|---|---|
| Velvet, corduroy, leather | Hoop ring crushes or marks the pile or surface | Temporary spray adhesive |
| Towels, terry | Thick, springy, will not hoop flat | Adhesive plus a topping |
| Small pieces, pockets | Too small to reach the hoop ring | Adhesive on hooped stabilizer |
| Finished garments | Hard to hoop without distortion | Adhesive or a basting box |
To float, hoop the stabilizer, spray it lightly with temporary adhesive, smooth the fabric on top, and stitch a basting outline first so the fabric cannot shift. For the thickest items and caps, a magnetic hoop can grip where a standard hoop cannot; see magnetic embroidery hoops.
How do you avoid hoop burn?
Hoop burn is the crease or shine the hoop ring presses into fabric. Prevent it rather than fix it: float delicate fabrics so the ring never touches them, avoid over-tightening the screw, and take the hoop off as soon as the design finishes instead of leaving fabric clamped for hours.
A magnetic hoop spreads its grip and is gentler than a screw hoop, which helps on fabrics prone to marking. If a mild mark does appear, steam or a damp pressing cloth often lifts it. A permanent mark on a customer garment is not recoverable, so for anything valuable, test on a scrap of the same fabric first.
How do you square the design on the fabric?
Use the hoop’s gridded template and the fabric’s own lines to align everything before you commit. Mark the design center on the fabric with a water-soluble pen or a pin, line it up with the crosshairs on the template, and keep the fabric grain parallel to the hoop edges.
A design hooped crooked stitches crooked, and no software setting fixes a skewed hooping. Most machines also let you move or rotate the design a few millimeters on screen for final alignment, but that is for fine adjustment, not for rescuing a badly placed hooping. For placement on tricky items like shirt fronts, a basting box stitched first shows exactly where the design will land.
What tools make hooping easier and more consistent?
A few inexpensive tools take the guesswork out of hooping and make every piece land the same way. None are essential, but they pay for themselves quickly if you hoop often.
- Gridded templates: the plastic grids that come with most hoops; line up the fabric center and grain every time.
- Water-soluble or air-erase marker: mark the design center and a vertical line on the fabric to align with the template.
- Temporary spray adhesive: holds stabilizer to fabric and is the key to floating.
- A hooping station or clamp: a fixed jig that holds the outer ring square while you press the inner ring in, for repeatable placement on shirts and bags.
- Target stickers: printed crosshair stickers that mark placement on a finished garment, read by many machines’ built-in cameras.
For repeat work like shirts, a hooping station plus target stickers turns a fiddly job into a quick, consistent one. For single projects, the template and a marker are enough.
How do you hoop small or awkward pieces?
Small pieces, pockets, collars and babywear are too small to reach the hoop ring, so you float them on hooped stabilizer. Hoop a firm stabilizer alone, spray it lightly with temporary adhesive, smooth the small piece on top centered to the template, and stitch a basting outline so it cannot shift.
The basting box is the key step for anything floated: it tacks the piece to the stabilizer before the design starts, and you remove it afterward. For items with a seam or edge near the design, like a pocket, mark the safe area first so the needle does not hit a thick seam. Readymade garments follow the same float-and-baste approach rather than forcing a bulky item flat into a ring, which is also how most patches are stitched.
Who should not hoop the standard way?
- Anyone embroidering thick towels or finished garments. Float instead; hooping them flat is often impossible.
- Embroiderers on pile or delicate fabrics. Velvet, leather and vinyl mark, so float and never clamp the fabric in the ring.
- Beginners fighting puckering. The answer is rarely tighter hooping. Fix the stabilizer and the taut-not-stretched technique first.
Hooping, stabilizer and thread work as a set; if one is wrong the others cannot compensate. See the thread guide and match your hoop size to the design before you start.
Sources: Machine embroidery hooping practice from Brother and Janome machine manuals (hooping steps, template use); stabilizer and floating guidance from Madeira and Sulky educational materials; common hoop-burn prevention practice for pile and delicate fabrics.
Frequently asked questions
Quick answers to what readers ask us most
Should embroidery fabric be tight in the hoop?
It should be taut and flat, like a drum, but not stretched. Pull out wrinkles without stretching the weave or knit. Stretched fabric snaps back after stitching and distorts the design, puckering the surface. Stable wovens tolerate a firmer hoop than stretchy knits.
Do you hoop the stabilizer with the fabric?
Usually yes. Cut-away and tear-away stabilizers are hooped together with the fabric so both are held firm. The exception is delicate or thick fabric, which you float: hoop the stabilizer alone and attach the fabric on top with temporary spray adhesive or a basting box.
What is floating in machine embroidery?
Floating means hooping only the stabilizer and laying the fabric on top, held by spray adhesive, pins outside the design, or a basting stitch. It is used for velvet, leather, towels and anything that would mark or will not sit flat in a hoop.
How do I stop hoop burn?
Hoop burn is a crease or mark the hoop ring leaves on fabric. Avoid it by floating delicate fabrics, using a magnetic hoop that clamps gently, not over-tightening the screw, and removing the hoop promptly after stitching. Steam or a damp press often lifts a mild mark.
Why does my design pucker even when hooped tightly?
Over-tight hooping is often the cause, not the cure. Stretched fabric relaxes after stitching and puckers. The real fixes are the right stabilizer for the fabric, taut-not-stretched hooping, and a design density the fabric can carry. Check the stabilizer first.